


Affiliate Disclaimer
Some links in this article are affiliate links. We may earn a small commission if you make a purchase through these links, at no extra cost to you. We only recommend products we find useful to our readers
When it comes to exercising the very first thing that comes to our mind, to clean our body as well as soul is by performing yoga. Yoga is considered as one of the best forms of exercising that can never be changed as it can literally bend your body and make it not only fat free but also stress free. So here, are some yoga postures for weight loss that you can perform at home.
Yoga Postures For Weight Loss
1Utkatasana or Chair Pose
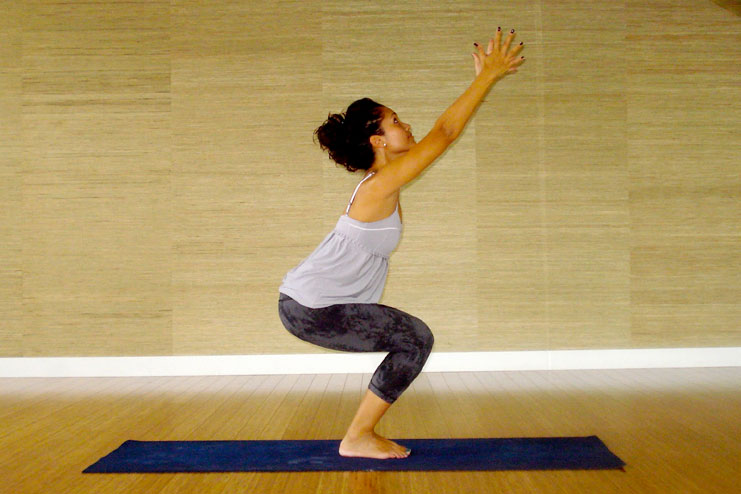
- First stand in Tadasana. While inhaling raise the arms that is perpendicular to the floor. You can either keep your arms parallel, and palms facing each other, or even join the palms.
- While exhaling try to bend the knees a little. Keep your thighs as much parallel to the floor as possible. The knees can project out over the feet, and the torso can lean slightly forward over the thigh until the front torso can form approximately a right angle with top of the thighs. Try to keep your inner thighs parallel with each other and then press the heads of the thigh bones down toward the heels.
- Now firm out the shoulder blades against your back. Try to take the tailbone down towardsthe floor and also towardsthe pubis to keep your lower back long.
- Try to stay in this pose for about 30 seconds to at least a minute. To come out, straighten the knees while inhalation, lift with your arms strongly. Now, while exhaling release the arms to your sides in Tadasana.
Benefits
- It helps to strengthen the ankles, calves, thighs, and spine
- It helps to stretch shoulders as well as chest
- It helps to stimulate the abdominal organs, diaphragm, and the heart
- It can help to reduce flat feet
2Ardha Matsyendrasana or Half Lord of the Fishes Pose
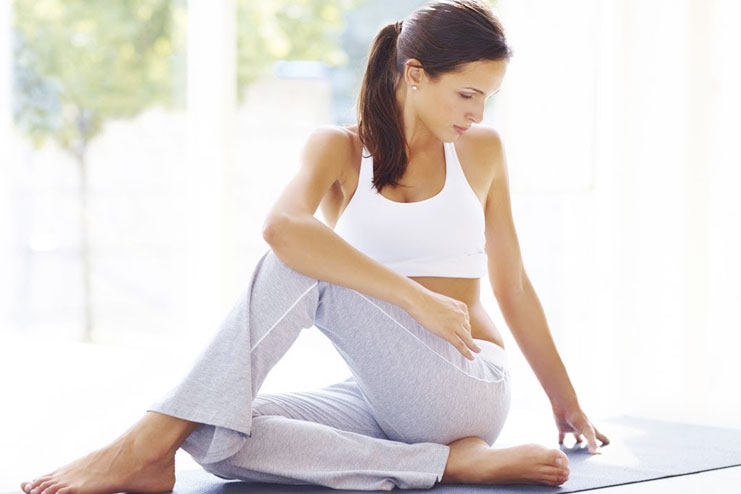
- First sit onto the floor with the legs straight out in the front, buttocks supported in a folded blanket. Try to bend the knees, put the feet on the floor, then try to slide the left foot under the right leg outside of the right hip. Then lay outside of the left leg onto the floor. Try to step the right foot over your left leg and stand on the floor outside of the left hip. The right knee must point directly up to the ceiling.
- While exhaling try to twist toward the inside of your right thigh. Now, press the right hand against the floor, just behind the right buttock, and set the left upper arm outside of the right thigh near to the knee. Pull the front torso and the inner right thigh together.
- Now press the inner right foot into the floor, releasing the right groin, as well as lengthening the front torso. Then lean to the upper torso back, against your shoulder blades, and try to continue to lengthen the tailbone in the floor.
- If you want, you can turn the head in any one of two directions: Try to continue this twist of the torso by turning to the right; or even counter the twist of the torso by turning it to the left and looking over the left shoulder to the right foot.
- While inhaling try to lift a little more through the sternum, pushing your fingers against the floor to help. Now twist a little with every exhalation. Be sure that you can distribute the twist evenly throughout your entire length of your spine; do not concentrate on the lower back.
- Try to stay for at least 30 seconds to 1 minute, then release from this pose with an exhalation, and return to the starting position. Repeat it from the left for a same length of time.
Benefits
- It can help to stimulates the liver and kidneys
- It can help to stretch the shoulders, hips, as well as the neck
- It can help to energize the spine
- It can help to stimulate the digestive fire into the belly
- It can help to give relief from the menstrual discomfort, sciatica, fatigue, and backache
- It can help to give therapeutic relief form asthma as well as infertility
- It can also help to increases the appetite, destroy deadly diseases, and awakens the kundalini.
3Parighasana or Gate Pose
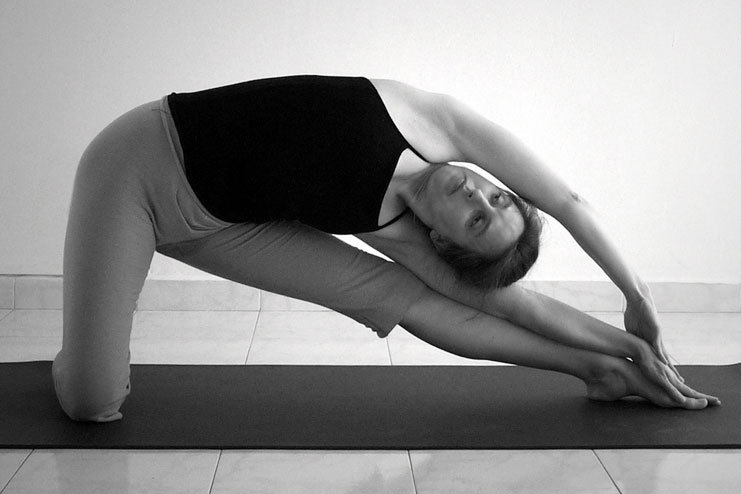
- First kneel onto the floor. Thenstretch the right leg to the right and pressing the foot to the floor. Try to keep your left knee directly below the left hip (so that the thigh is perpendicular from the floor), and align the right heel with the left knee. Turn the pelvis slightly to the right (so that the left hip point can come forward to the right), but turn the upper torso back to the left. Point your kneecap toward the ceiling, which can be required to turn the right leg out.
- While you inhale, bring the arms out to the sides, parallel from the floor, and the palms down. Now bend to the right over the plane of your right leg and lay the right hand down to the shin, ankle, or the floor outside of the right leg. Contract to the right side of the torso and stretch to the left. Place the left hand onto the outer left hip and push your pelvis down toward the floor. Then slip your hand up to the lower left ribs and lift them to the shoulder, creating a space in the left waist.
- While inhaling, sweep your left arm over to the back of the left ear. The side bend can drop the torso towardsthe floor. Without just by pushing the left hip back (try to continue to roll it slightly forward), now turn the upper torso away from the floor.
Weight Loss Yoga For Beginners
- Remember to stay on this pose from anywhere between 30 seconds to a minute. Come up slowly as you inhale, reaching to the top arm and draw the torso upright. Bring the right knee back beside the left, and repeat with your legs reversed.
Benefits
- It can help to stretch the side of the torso as well as the spine
- It can help to stretch the hamstrings
- It can help to open up the shoulders
- It can help to stimulate the abdominal organs and the lungs
4Urdhva Prasarita Eka Padasana or Standing Split
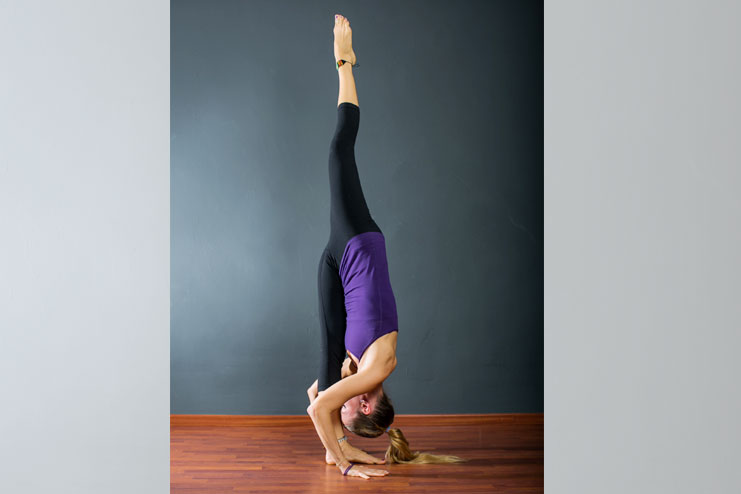
- Begin with performing Virabhadrasana II or Warrior II Pose, and the right leg forward. While inhaling as well as cartwheel the left arm up, over the head, creating a opening in your left ribs.
- While exhaling, twist the torso to your right, pivoting to the ball of the left foot to lift the heel from the floor. Then while leaning forward, lay the front torso on the right thigh and then set the hands onto the floor on either sides of the right foot.
- Try to walk with the hands slightly ahead, and shift the weight on the right foot. Then, while inhaling slowly straighten the right leg, and simultaneously lift the left leg parallel to the floor.
- Remember that the proper balancing of external as well as the internal rotation of each of the leg is important, especially for your standing leg. Your left leg and the hip might tend to rotate externally slightly, lifting your hip away off from the floor and then angling your pelvis to the right. Remember to keep the front pelvis parallel to the floor by rotating internally the left thigh.
- Now, while paying close attention to your standing leg, especially the ankle of your knee. The knee can tend to rotate in: Be sure that you rotate the thigh outwardly and turn your knee so that the kneecap is facing straight ahead.
- You can feel on how this downward energy of your standing leg can create an upward movement into the raising leg. Try not to focus on how high the raised leg can go; instead, you can work towards directing the equal energy into both of your legs. You can also hold your raised leg more or less parallel from the floor, or can just try to raise it slightly more higher; ideally the torso can descend as the leg ascends. If you are more flexible you can grasp back of the standing leg ankle with the hand.
- Try to stay on this pose for 30 seconds to a minute. Then, slowly lowering your raised leg, exhale as well as repeat from the other side for the same length of time.
Benefits
- It helps to calm down the brain.
- It can help to stimulate the liver as well as the kidneys
- It can help to stretch the hamstrings, calves, as well as the thighs
- It can help to strengthen the thighs, knees, and the ankles
- It can help to stretch the back of your leg, the front thigh and the groin
Yoga Poses For Belly Weight Loss
Note:
It is recommended that these exercises must be practiced under the supervision of a trained professional.


